

*********The NEW S5 LED look for your Jetta, Golf or Gti Headlights**********
Im in the process of this one right now, so more pictures will be posted as they become available, I do not have pictures of the old ones.. sorry...
Okay guys, First order about 19 inches of these leds
http://www.oznium.com/led-flex-strips
I used the "white" color. You can scroll down the page to view what each shade of white looks like.
Once you order these , oznium says it takes 7-10 days but you'll prolly get it sooner.
If you are following this diy exactly cut twelve "white dots or led's" in from the end(the side without the wires" and snip. These are excellent because they already have the wire soldierd, they are flexible, brighter and better spaced then the previous version...
Follow this diy to remove the front end (this is necesarry)
http://www.ottawa-vdubbing.com...10525
Once the bumper is off, then its time to pull off the headlgihts. There are four screws that hold the headlight on.
There are two on top, and two beneath the light. Once these are unscrewed, then unplug the power lines connected to the
light.
Okay, the headlights are off...
![Image]()
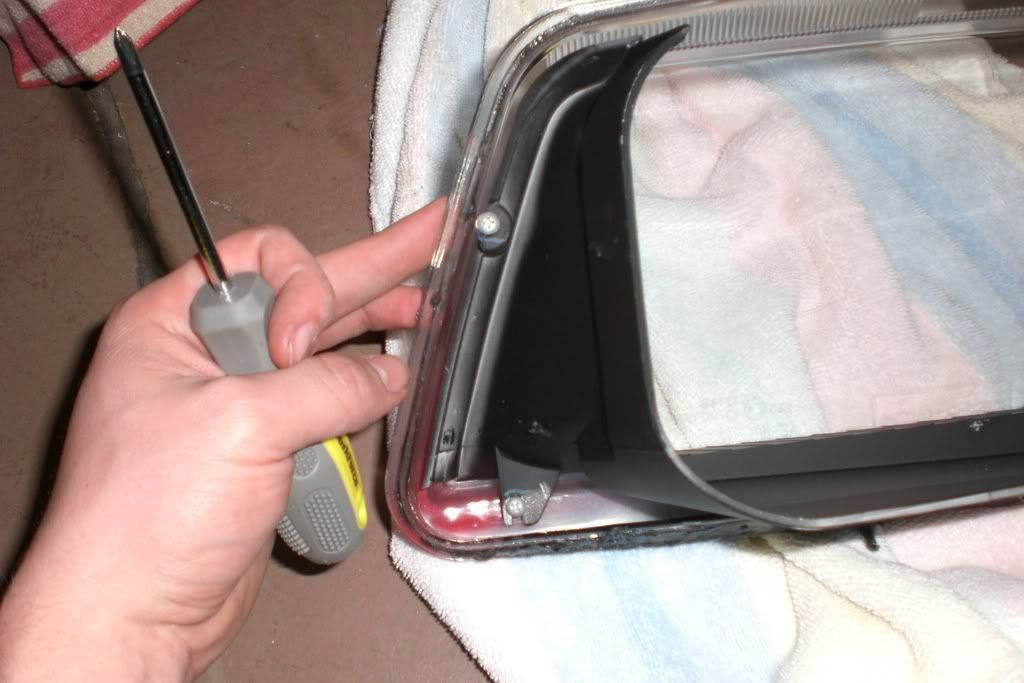
there are four metal clips on each light. You have to remove these, so take a screwdriver and pry em off. Be sure to make
a mental note of where they were at.
Now, this is the fun part.
![Image]()
![Image]()
Use a heat gun to heat up the adhesive that is all around the edge of the plastic headlight casing. (where the black plastic
meets the clear plastic). TAKE YOUR TIME WITH THIS STEP!! As you run the hot air over the plastic (move about an inch for 30 sec.)
take a flat tip screwdriver, and pry the headlights apart. This can get sticky and very hot so be warned.
![Image]()
So the headlights are apart, and your thinking oh my god...
![Image]()
![Image]()
We arent concerned with the black part of the headlight yet, so you can set that aside.
![Image]()
Next remove the chrome piece on the stock headlights...
![Image]()
![Image]()
There are four little screws that hold that chrome peice in place, and you gotta pull them out. There are two screws that
hold another smaller peice on, but ignore those because thats not necessary to take apart.
Now, you have the chrome peice. Dont put too many finger marks on anything, because unless you clean them off, you will
be able to see them when your all done.
This is where the tricky part is, and this is where the first diy and the second split off
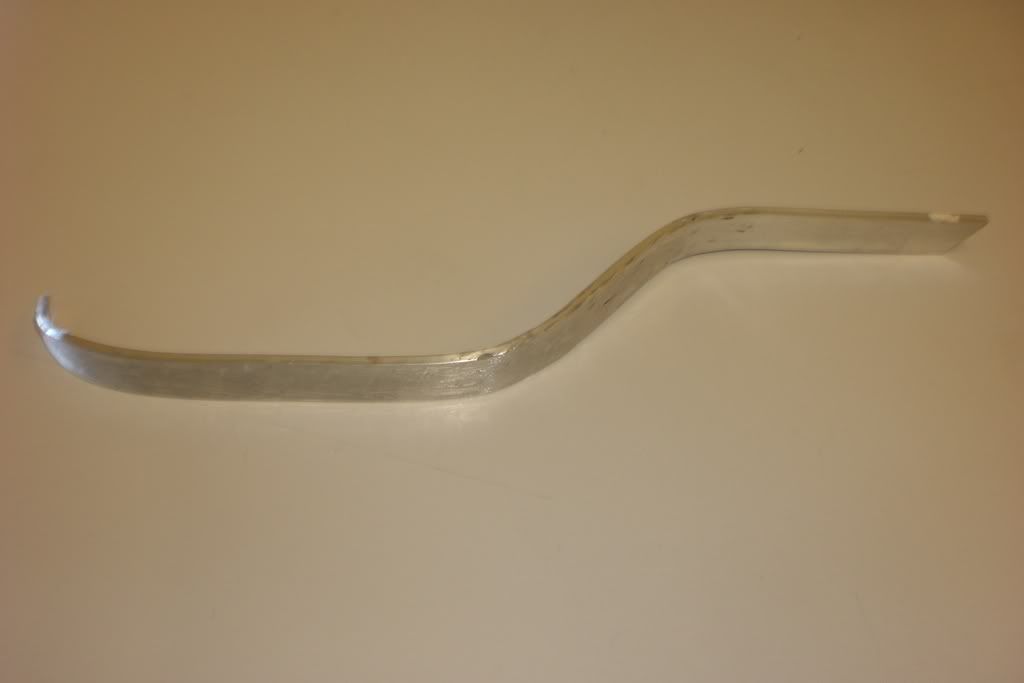
you have to fabricate peices of aluminum that sit inside the headlight. This means that they will somehow be attached to the chrome strip that you pulled out of your headlight. These only need to look to your liking, the leds can go on top, or below this aluminum strip, I recommend they go below to shield the light... This is by far the hardest part and I will not go into detail for the following reasons...
1. Because I want to reserve some amount of uniqueness for myself
2. It takes to long to explain
I also painted the top of my aluminum pieces to blend with the headlights...
Anyway, when they are finished, they can look something like this
![Image]()
Now, you will need to drill a hole in the chrome(or in my case black) strip. This is for the wires to protrude into the main headlight casing...
[picture of hole]
Once you have drilled the hole and know EXACTLY where the wires, leds, and the aluminum strip will line up at, you can go ahead and attach the adhesive backing that the led's came with. once your leds are fixed to the aluminum piece, use some clear adhesive caulking to attach the aluminum bars to the chrome(or black) piece...
[caulking]
let that dry for a hour or so, and then when its all finished, re attach the chrome peice to the headlight lense.
Now, position the lens over the main headlight as if you were going to re-assemble it, and take note of where the wire naturally navigates to. Drill a hole so that the wire can be run to the outside of the headlight, mine did not need this step, but you get the picture...
now, re assemble the lens, feed the wire through your freshly drilled hole, and pull it so it is snug, do not pull to hard for fear of screwing something up!
Then once the lens is back in place, use a generous amount of caulking to seal them up, its crucial to sealing them up right, otherwise, they will look like a pos in no time flat!
make sure to get the hole in the back where the wires come out, as this will cause condensation too. While the caulking is still wet, place the clips back on. This will make a good tight seal.
After the sealent dries, you can put the headlights back in place. Just place the screws back in where they came out and plug the power back in.
Wire your new lights up to anything you want, I chose to have a switch power mine directly from the battery. That part is really easy.
And also so it turns on with the remote-This step is really hard so im not going to explain it
but you can e-mail me if your having questions...
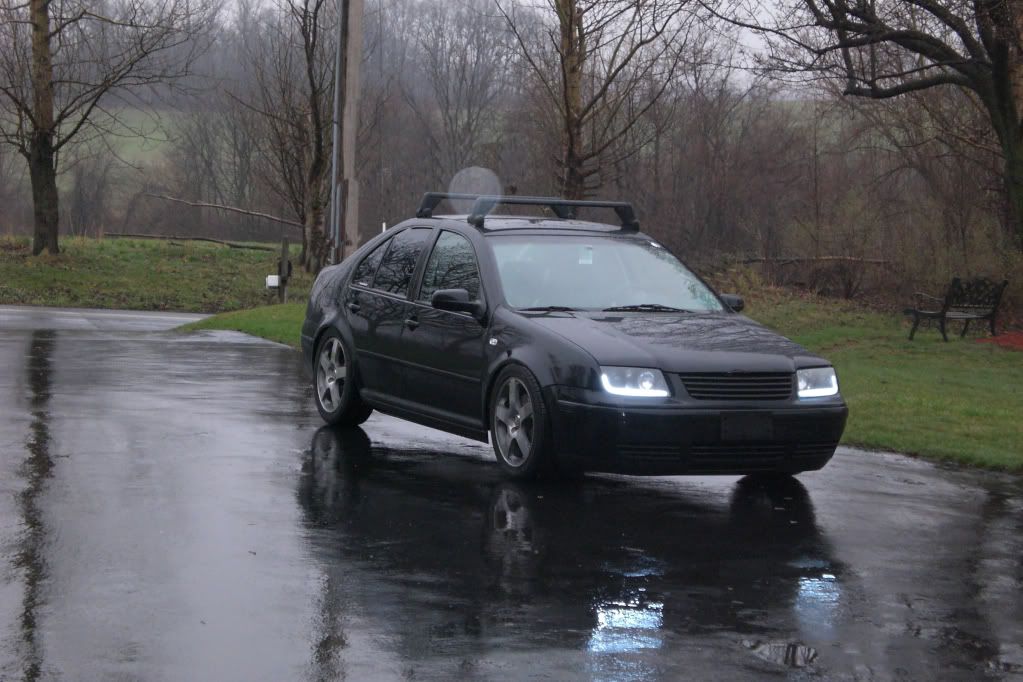
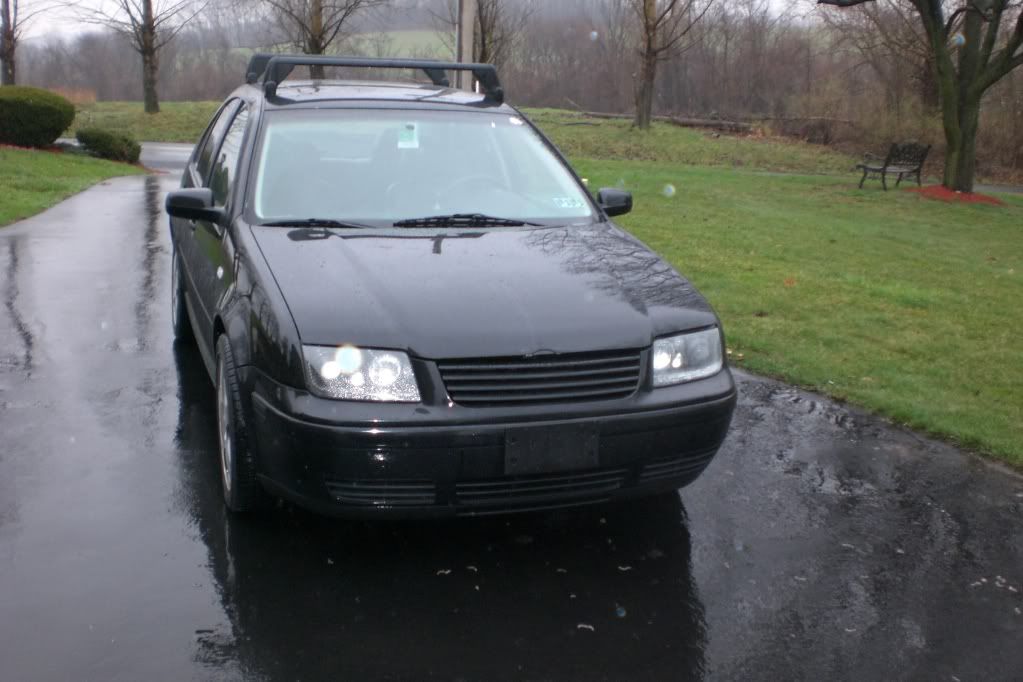
After your LEDs are wired up and your Front end is back together (see aforementioned DIY) Congradulations! You have officially S fived your headlights!
if you have any questions feel free to send me a email.
(I WILL NOT TAKE RESPONSIBILITY FOR ANY F u c k u p s so PLEASE BE WARNED!)
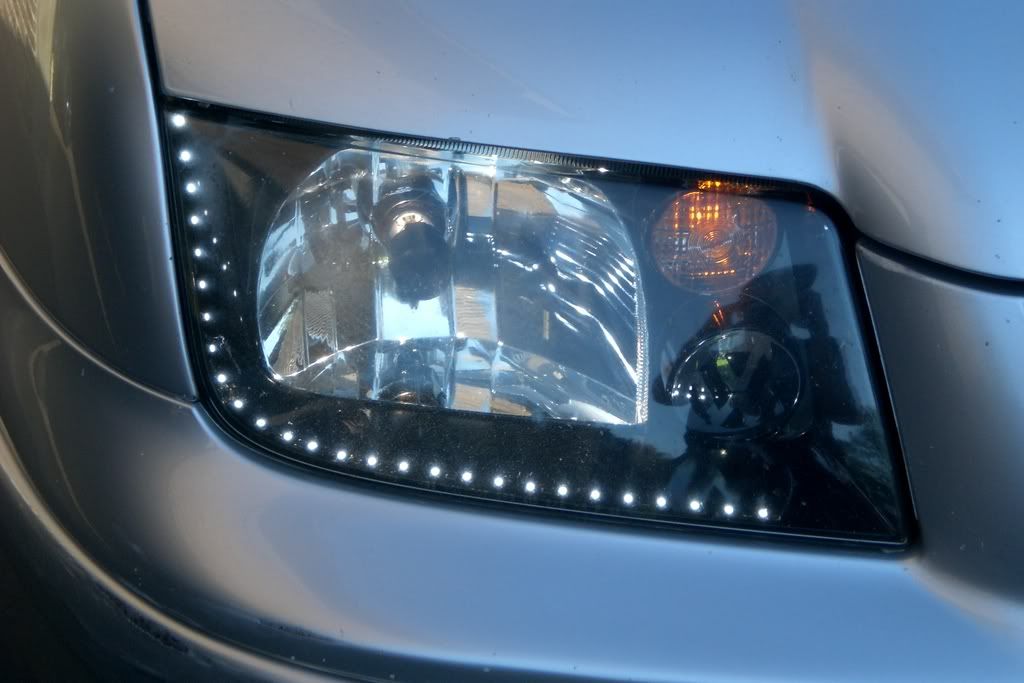
Thanks guys! Here is the finished product!!
![Image]()
![Image]()
![Image]()
![Image]()
![Image]()
![Image]()
Night time/ Dry Pictures
![Image]()
![Image]()
![Image]()
![Image]()
![Image]()
![Image]()
![Image]()
-
-
-
-
-
-
-
-
-
_____________**********Old WAY********__________________________
![Image]()
![Image]()

Okay guys, First order about 3 feet of these leds
http://www.oznium.com/led-ribbon
I used the "neutral white" color. You can scroll down the page to view what each shade of white looks like.
Once you order these , oznium says it takes 7-10 days but you'll prolly get it sooner.
Once they arrive, you can either leave the orange strips as they are, or you can paint them. I chose to paint them
black because my headlights were already black due to the "Joey mod". If you choose to paint them, make sure that
you cover the actual LED lights, these are the little white dots. I chose to cut out little electical tape squares
and cover the leds with them. after you cover the white lights, then you cut the stips. This step is pretty self
explanitory. There are little marks on the actual strip where you cut them. I counted nine lines and then cut. If
you follow the "nine lines", after you cut the second strip out, you are left with about 3 lines left. The next thing you
want to do is soldier the wires to the stips. Pick either end of each strip and soldier a wire to the negetive and a wire to the positive.
They are marked by a white + and -. It doesnt matter the length of the wire as long as its longer than 5 inches.
After all this is done, you can paint them if you choose.
After the paint dries, follow the steps in this DIY to remove the front end.
http://www.ottawa-vdubbing.com...10525
Once the bumper is off, then its time to pull off the headlgihts. There are four screws that hold the headlight on.
There are two on top, and two beneath the light. Once these are unscrewed, then unplug the power lines connected to the
light.
Okay, the headlights are off...
there are four metal clips on each light. You have to remove these, so take a screwdriver and pry em off. Be sure to make
a mental note of where they were at.
Now, this is the fun part.
Use a heat gun to heat up the adhesive that is all around the edge of the plastic headlight casing. (where the black plastic
meets the clear plastic). TAKE YOUR TIME WITH THIS STEP!! As you run the hot air over the plastic (move about an inch for 30 sec.)
take a flat tip screwdriver, and pry the headlights apart. This can get sticky and very hot so be warned.
So the headlights are apart, and your thinking oh my god...
We arent concerned with the black part of the headlight yet, so you can set that aside.
There are four little screws that hold that chrome peice in place, and you gotta pull them out. There are two screws that
hold another smaller peice on, but ignore those because thats not necessary to take apart.
Now, you have the chrome peice. Dont put too many finger marks on anything, because unless you clean them off, you will
be able to see them when your all done.
If you are looking at that peice like it is when its in the headlight or on the car, at the lop left or top right, depending on which side,
there will be a little hole that is used for achoring the chrome strip to the light. You have to drill a hole somewhere next to it. (somewhere so no one
will see it). ONLY DRILL A NECESARY SIZED HOLE!!! Go as small as you can. Just to allow both positive and negetive wires to go through. Next, look at your
black headlight casing. Where the hole you drilled in the chrome lines up in the black casing, drill a hole in the casing. (hold the chrome on the headlight
as if it were on). drill your hole where the chrome accent's hole is lined up at.
Now back to the lights...
Take your LED strip and place the wires in the hole in the chrome peice. They dont need to be pulled through tight yet, so leave yourself enough wire to work
with. Practice how you will position the LED strip on the chrome before you actually adhere it. Once you feel comfortable with you positioning, pull the
adhesive covering off of the back of the LED strip. Start from the Wires to the end, this ensures no "bubbles". After the strip has been firmly adhered,
you can then screw the chrome strip back into the clear headlight casing.
Now, before you close up the lights, pull the wires snug through the hole in the chrome strip. Run the wires through the hole you drilled in the black
casing. Then Start pushing the lights back together. Once the cover is in place, you can then pull the wires snug. Dont pull too hard though for fear of
breaking your soldier.
Then reseal the lights. Be very generous with the sealant. I used adhesive clear drying silicone sealant. I used almost half of the tube just on these lights.
You have to make sure that the seal is 100% leak proof, otherwise, you will get condensation in your headligts, and thats not good for many reasons.
Also, pump some sealant into the hole where you have the wires potruding out. While the sealent is still wet, place the clips back on, this helps with the seal.
After the sealent dries, you can put the headlights back in place. Just place the screws back in where they came out and plug the power back in.
Wire your new lights up to anything you want, I chose to have a switch power mine directly from the battery. This step is really easy so im not going to explain it
but you can e-mail me if your having problems...
After your LEDs are wired up and your Front end is back together (see aforementioned DIY) Congradulations! You have officially S fived your headlights!
Here ends the Mozer mod....
(sorry no pictures, but I tried the best I could to explain it, of course if you have any questions feel free to send me a email.)
(I WILL NOT TAKE RESPONSIBILITY FOR ANY AW ****S!! SO PLEASE BE WARNED!)
Thanks guys!
Modified by Ram5391 at 7:24 PM 10-8-2008
Modified by Ram5391 at 1:48 PM 10-30-2008
Modified by Ram5391 at 1:49 PM 10-30-2008
Modified by Ram5391 at 1:50 PM 10-30-2008
Modified by Ram5391 at 2:04 PM 2-12-2009
Modified by Ram5391 at 2:06 PM 2-12-2009
Modified by Ram5391 at 2:07 PM 2-12-2009
Modified by Ram5391 at 10:58 PM 4-1-2009
Modified by Ram5391 at 10:59 PM 4-1-2009
Modified by Ram5391 at 8:49 PM 5-3-2009
Im in the process of this one right now, so more pictures will be posted as they become available, I do not have pictures of the old ones.. sorry...
Okay guys, First order about 19 inches of these leds
http://www.oznium.com/led-flex-strips
I used the "white" color. You can scroll down the page to view what each shade of white looks like.
Once you order these , oznium says it takes 7-10 days but you'll prolly get it sooner.
If you are following this diy exactly cut twelve "white dots or led's" in from the end(the side without the wires" and snip. These are excellent because they already have the wire soldierd, they are flexible, brighter and better spaced then the previous version...
Follow this diy to remove the front end (this is necesarry)
http://www.ottawa-vdubbing.com...10525
Once the bumper is off, then its time to pull off the headlgihts. There are four screws that hold the headlight on.
There are two on top, and two beneath the light. Once these are unscrewed, then unplug the power lines connected to the
light.
Okay, the headlights are off...

there are four metal clips on each light. You have to remove these, so take a screwdriver and pry em off. Be sure to make
a mental note of where they were at.
Now, this is the fun part.


Use a heat gun to heat up the adhesive that is all around the edge of the plastic headlight casing. (where the black plastic
meets the clear plastic). TAKE YOUR TIME WITH THIS STEP!! As you run the hot air over the plastic (move about an inch for 30 sec.)
take a flat tip screwdriver, and pry the headlights apart. This can get sticky and very hot so be warned.
So the headlights are apart, and your thinking oh my god...


We arent concerned with the black part of the headlight yet, so you can set that aside.
Next remove the chrome piece on the stock headlights...

There are four little screws that hold that chrome peice in place, and you gotta pull them out. There are two screws that
hold another smaller peice on, but ignore those because thats not necessary to take apart.
Now, you have the chrome peice. Dont put too many finger marks on anything, because unless you clean them off, you will
be able to see them when your all done.
This is where the tricky part is, and this is where the first diy and the second split off
you have to fabricate peices of aluminum that sit inside the headlight. This means that they will somehow be attached to the chrome strip that you pulled out of your headlight. These only need to look to your liking, the leds can go on top, or below this aluminum strip, I recommend they go below to shield the light... This is by far the hardest part and I will not go into detail for the following reasons...
1. Because I want to reserve some amount of uniqueness for myself
2. It takes to long to explain
I also painted the top of my aluminum pieces to blend with the headlights...
Anyway, when they are finished, they can look something like this
Now, you will need to drill a hole in the chrome(or in my case black) strip. This is for the wires to protrude into the main headlight casing...
[picture of hole]
Once you have drilled the hole and know EXACTLY where the wires, leds, and the aluminum strip will line up at, you can go ahead and attach the adhesive backing that the led's came with. once your leds are fixed to the aluminum piece, use some clear adhesive caulking to attach the aluminum bars to the chrome(or black) piece...
[caulking]
let that dry for a hour or so, and then when its all finished, re attach the chrome peice to the headlight lense.
Now, position the lens over the main headlight as if you were going to re-assemble it, and take note of where the wire naturally navigates to. Drill a hole so that the wire can be run to the outside of the headlight, mine did not need this step, but you get the picture...
now, re assemble the lens, feed the wire through your freshly drilled hole, and pull it so it is snug, do not pull to hard for fear of screwing something up!
Then once the lens is back in place, use a generous amount of caulking to seal them up, its crucial to sealing them up right, otherwise, they will look like a pos in no time flat!
make sure to get the hole in the back where the wires come out, as this will cause condensation too. While the caulking is still wet, place the clips back on. This will make a good tight seal.
After the sealent dries, you can put the headlights back in place. Just place the screws back in where they came out and plug the power back in.
Wire your new lights up to anything you want, I chose to have a switch power mine directly from the battery. That part is really easy.
And also so it turns on with the remote-This step is really hard so im not going to explain it
but you can e-mail me if your having questions...
After your LEDs are wired up and your Front end is back together (see aforementioned DIY) Congradulations! You have officially S fived your headlights!
if you have any questions feel free to send me a email.
(I WILL NOT TAKE RESPONSIBILITY FOR ANY F u c k u p s so PLEASE BE WARNED!)
Thanks guys! Here is the finished product!!


Night time/ Dry Pictures


-
-
-
-
-
-
-
-
-
_____________**********Old WAY********__________________________

Okay guys, First order about 3 feet of these leds
http://www.oznium.com/led-ribbon
I used the "neutral white" color. You can scroll down the page to view what each shade of white looks like.
Once you order these , oznium says it takes 7-10 days but you'll prolly get it sooner.
Once they arrive, you can either leave the orange strips as they are, or you can paint them. I chose to paint them
black because my headlights were already black due to the "Joey mod". If you choose to paint them, make sure that
you cover the actual LED lights, these are the little white dots. I chose to cut out little electical tape squares
and cover the leds with them. after you cover the white lights, then you cut the stips. This step is pretty self
explanitory. There are little marks on the actual strip where you cut them. I counted nine lines and then cut. If
you follow the "nine lines", after you cut the second strip out, you are left with about 3 lines left. The next thing you
want to do is soldier the wires to the stips. Pick either end of each strip and soldier a wire to the negetive and a wire to the positive.
They are marked by a white + and -. It doesnt matter the length of the wire as long as its longer than 5 inches.
After all this is done, you can paint them if you choose.
After the paint dries, follow the steps in this DIY to remove the front end.
http://www.ottawa-vdubbing.com...10525
Once the bumper is off, then its time to pull off the headlgihts. There are four screws that hold the headlight on.
There are two on top, and two beneath the light. Once these are unscrewed, then unplug the power lines connected to the
light.
Okay, the headlights are off...
there are four metal clips on each light. You have to remove these, so take a screwdriver and pry em off. Be sure to make
a mental note of where they were at.
Now, this is the fun part.
Use a heat gun to heat up the adhesive that is all around the edge of the plastic headlight casing. (where the black plastic
meets the clear plastic). TAKE YOUR TIME WITH THIS STEP!! As you run the hot air over the plastic (move about an inch for 30 sec.)
take a flat tip screwdriver, and pry the headlights apart. This can get sticky and very hot so be warned.
So the headlights are apart, and your thinking oh my god...
We arent concerned with the black part of the headlight yet, so you can set that aside.
There are four little screws that hold that chrome peice in place, and you gotta pull them out. There are two screws that
hold another smaller peice on, but ignore those because thats not necessary to take apart.
Now, you have the chrome peice. Dont put too many finger marks on anything, because unless you clean them off, you will
be able to see them when your all done.
If you are looking at that peice like it is when its in the headlight or on the car, at the lop left or top right, depending on which side,
there will be a little hole that is used for achoring the chrome strip to the light. You have to drill a hole somewhere next to it. (somewhere so no one
will see it). ONLY DRILL A NECESARY SIZED HOLE!!! Go as small as you can. Just to allow both positive and negetive wires to go through. Next, look at your
black headlight casing. Where the hole you drilled in the chrome lines up in the black casing, drill a hole in the casing. (hold the chrome on the headlight
as if it were on). drill your hole where the chrome accent's hole is lined up at.
Now back to the lights...
Take your LED strip and place the wires in the hole in the chrome peice. They dont need to be pulled through tight yet, so leave yourself enough wire to work
with. Practice how you will position the LED strip on the chrome before you actually adhere it. Once you feel comfortable with you positioning, pull the
adhesive covering off of the back of the LED strip. Start from the Wires to the end, this ensures no "bubbles". After the strip has been firmly adhered,
you can then screw the chrome strip back into the clear headlight casing.
Now, before you close up the lights, pull the wires snug through the hole in the chrome strip. Run the wires through the hole you drilled in the black
casing. Then Start pushing the lights back together. Once the cover is in place, you can then pull the wires snug. Dont pull too hard though for fear of
breaking your soldier.
Then reseal the lights. Be very generous with the sealant. I used adhesive clear drying silicone sealant. I used almost half of the tube just on these lights.
You have to make sure that the seal is 100% leak proof, otherwise, you will get condensation in your headligts, and thats not good for many reasons.
Also, pump some sealant into the hole where you have the wires potruding out. While the sealent is still wet, place the clips back on, this helps with the seal.
After the sealent dries, you can put the headlights back in place. Just place the screws back in where they came out and plug the power back in.
Wire your new lights up to anything you want, I chose to have a switch power mine directly from the battery. This step is really easy so im not going to explain it
but you can e-mail me if your having problems...
After your LEDs are wired up and your Front end is back together (see aforementioned DIY) Congradulations! You have officially S fived your headlights!
Here ends the Mozer mod....
(sorry no pictures, but I tried the best I could to explain it, of course if you have any questions feel free to send me a email.)
(I WILL NOT TAKE RESPONSIBILITY FOR ANY AW ****S!! SO PLEASE BE WARNED!)
Thanks guys!
Modified by Ram5391 at 7:24 PM 10-8-2008
Modified by Ram5391 at 1:48 PM 10-30-2008
Modified by Ram5391 at 1:49 PM 10-30-2008
Modified by Ram5391 at 1:50 PM 10-30-2008
Modified by Ram5391 at 2:04 PM 2-12-2009
Modified by Ram5391 at 2:06 PM 2-12-2009
Modified by Ram5391 at 2:07 PM 2-12-2009
Modified by Ram5391 at 10:58 PM 4-1-2009
Modified by Ram5391 at 10:59 PM 4-1-2009
Modified by Ram5391 at 8:49 PM 5-3-2009


