VW Vortex - Volkswagen Forum banner

MK4 Steering Rack Hard Line Replacement PTFE Kit - Need Help

1 reading
41K views 90 replies 24 participants last post by  Rabbit Farmer  
#1 ·
Hi All:

We're about to release a new product / kit and need a volunteer that is willing to install and test for us in a timely fashion (within 2-4 weeks).

Now owners will be able to replace their rusted out rack hard lines with our PTFE racing hose kit replacement, w/o having to replace the entire rack or perform a hack. PTFE hoses don't make this offering that special, the fittings/adapters do. They are custom built by EAA, and adapt the rack connection to a -4AN male.

We need someone that needs to replace these now to fit them up and confirm operation (i.e., ensure they don't leak).

Contact or post here if you can do it within a 2-4 week time frame. Volunteer gets to keep kit free. Thanks.

Some pics:


#3 ·
I work on heavy equipment for a living so I know hydraulic lines and fittings like the back of my hand. I would love to test a kit and provide feedback. I can install the same day I recieve the kit and provide feedback immediately, as well as follow-up feedback after some use.
2001 GTI with a 1.8t.
 
#4 ·
Sounds good guys, we'll plan on getting a kit out to the both of you. Just gotta get one more set of lines for the 2nd. Shoot us your addresses via pm. Thanks for quick responses! -Dave
 
#8 ·
Thanks for the positive feedback guys. We try to be innovative and fill the needs of owners of the older cars, while helping folks to save some money at the same time. Glad the manual setup is working out for you!
 
#9 ·
Hi Ben/Dan, I'll get one kit shipped out Monday, the other (mopar's) hopefully not too much later (might take a little time to get lined, although we may have what we need in house to fan up a set quickly).

Gotta love free stuff. Just an fyi, you will need to reuse the stock o-rings in your racks. I will follow up with pm's, just got back from vacation. Take it easy, Dave
 
#14 ·
These look great, I hope they end up working. I bought a R32 rack 6 months ago and I had to get the Hard Line soldered up at a local hydraulic shop because the R32 has different routing. Turns out the R32 racks have a couple extra fittings, making the hard lines route completely different. (possibly to clear the transfercase and driveshaft) These lines would have been very nice in that situation.
 
#15 · (Edited)
A big thanks to Dave for allowing me the chance to give these lines a trial fit!

I have had sufficient time to check these out and install them on my car. I am posting up a rough DIY with photos for not only Dave to use as he needs, but a guide for anyone in the future that purchases a set to install on their own car.

First off; my review. The lines themselves are very high quality. These are as good or better as any stainless braided I have used in high pressure/high heat applications. These are more than up to the task at hand. The crimp connections are very solid and quite smooth, indicative of high quality crimping equipment. These aren't some shade tree backyard crap, these are professional quality. The adapter fittings are as strong as feasible given the design parameters, machining work is top notch.

On to the install...

What you will need:
13mm wrench
9/16" wrench
5/8" wrench
T30 socket and ratchet
Small flat tipped screwdriver (1/8" blade or smaller)
Small hammer (6oz brad nailing hammer fits great)
Drain pan
Rags
Pentosin CH11F power steering fluid (I used a little under half a liter)
About an hour of your time

I was able to reach most of the fasteners and clips from the engine bay. Most of the reassembly was performed under the car however so make sure you safely jack your car up and place it solidly on jackstands. Don't die or seriously maim yourself due to rushing or the lack of proper equipment.

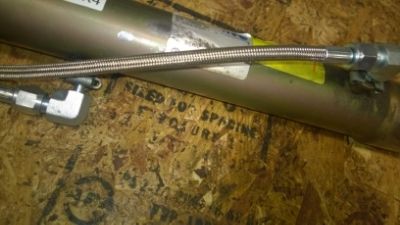
First of all, the lines and adapters
Image

Mine being pre-production parts will probably look slightly different than production sets, but not terribly noticeable.

On to the car.
If you have a heat shield in place like I did, it needs to be removed. Its held in by one nut on the passenger side;
Image

Seen in the upper left side of this photo. Remove the nut with a 13mm wrench.
Image

Here is the nut as seen from under the car.

The shield is also held on by 3 bolts on the driver's side;
Image

Seen here in the middle of the photo. Note the driver's side is up in this shot. Remove those 3 bolts with your 13mm wrench.

Image

In this shot you can see 2 of the bolts on the driver's side as well as the retainer bracket that holds the existing hard lines to the orbital valve portion of the steering rack.

Wrangle this bad boy out
Image

And you see the hard lines in all their glory
Image

Image

You can also see the clips that hold the other ends of the hard lines to the cylinder portion of the steering rack.
Image


To remove these clips I simply took my small hammer and tapped on the corners where there is an obvious open end
Image

This is what the clips look like. Remove them both on the cylinder end of the steering rack.

Take your T30 socket and ratchet and remove the retainer bracket and bolt from the valve end of the steering rack
Image

As seen here remove the bolt and simply slide the bracket rearward to free it from the lines.

Grab your drip pan and place it under the steering rack/subframe. Pop the ends out of the holes in the cylinder end of the rack and swivel them rearward over your drain pan. Let them drain completely to keep messiness to a minimum. They will completely drain the system so grab a beer/soda and take a break.

Once everything is done dripping, pop the other ends of the tubes out of the rack.
They will look like this, give or take
Image

As you can see 3 of my o-rings are still in the rack while 1 stayed on the tube while I removed it.
Use your small flathead screwdriver to remove any orings that remain in your rack. Just poke the tip through the center and gently lever to o-ring out of the hole.

Slide the o-rings on each of the new adapter fittings gently
Image


Poke each of the fittings with o-rings in each of the 4 holes that you removed the hard lines from.
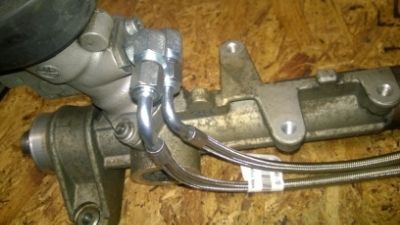
Connect the lines to each of the fittings, routing the lines to avoid touching the exhaust
Image

Image

Note that my lines are slightly longer than necessary and production units should fit nicer and not rest on the subframe as mine do.
Finger tighten the fittings after you have them routed how you want. Pop each fitting/adapter end out one at a time and tighten them. Use the 5/8" wrench to hold the adapter and tighten the fitting with the 9/16" wrench. Do NOT tighten them on the rack with just a 9/16" wrench, you WILL break the machined end of the adapter off into the rack. It will take patience and a little practice to get them tight without moving the line around on the adapter.
Once you have them all tight, reinstall the clips and brackets in reverse of how you removed them. Tighten the T30 bolt very snugly. Tap on the closed ends of the clips to get them back in place.

I left my heat shield off. The lines look too cool to cover up. If you want to reinstall the shield, you will need to trim around the hole where the bend from the original hard line protruded through the shield to fit over the new, larger adapter/fitting bend. Tin snips/dremel/grinder/whatever cutting tool you like to handle the job.

After everything is reassembled and to your liking, refill your power steering reservoir. I left my car on jackstands until I had bled all of the air out of the system. Simply start your car up and slowly rotate the steering wheel one direction until it reaches lock. Release the steering wheel and let it sit there for a moment. Slowly rotate the steering wheel the opposite direction to lock. Check the fluid level. Top off as necessary. Turn the steering wheel back and forth several times. When all the bubbles disappear from the reservoir you are fully bled. Lower the car safely to the ground and go for a short drive. Check for any leaks and adjust fittings as necessary.
 
#17 ·
After seeing these on the car I have to do something about the supply and return lines to the pump and reservoir. They need to be stainless PTFE to match the coolness of the lines on the rack.
 
#18 ·
Hey Ben, thanks for the detailed writeup, top notch. We do already have a SS PTFE high pressure (pump to rack) hose "kit" for the 1.8T's, if you're interested. It uses the reusable style hose ends w/brass compression ferrule:

http://www.eaaengineering.com/steering-conversion-kits-lines/steering-rack-lines/

We haven't 'developed' the reservoir return or pump feed lines for the 1.8T, yet, but maybe that is next if there is a need in the community. We could then offer a complete kit, as we have for the AAA VR6's, also seen in the link above.

Thanks again for your help.
 
#22 ·
Our supplier is showing end of the month on their website.

You may be able to put a patch on the pin hole leak, until they are available.
 
#25 ·
I know Im late to the party but these are definitely Id be into. I looped the rack on my MKIV track car last season and absolutely hate how sloppy the steering feels now and Ive been thinking of hooking the PS back up more and more lately. This would be more of a motivation to do so. :beer:
 
#26 ·
Hi all, we're pretty much done with trial fitments, and are building the first kits to be available within a couple weeks. Thanks
 
#27 ·
Just ordered one of the kits and received it the other day. I've dealt a lot with brake lines for motorcycles and overall build quality on these is very nice.

I am doing the install on an 01 TDI (rack appears to be identical) and I can't for the life of me reinstall the lower clip with the new fitting. I am using a small handlegrip clamp to set it but it simply isnt going deep enough into the port for the clip to clear the shoulder.

I will be getting a better c-clamp tomorrow although im a bit worried it'll put too much pressure on the fitting and break it.

So far everything else is fitting well.


Also EAA please package an extra o-ring with the kit! I lost one while taking the fittings in and out to adjust them and ended up having to reuse one.
 
#28 ·
The FIRST to reply!

Hello,
I was the very first to reply to you when you were asking for volunteers to install your new product. Unfortunately I had a couple weeks before I was on the road, that's when you said no worries I'll send you a kit out in a few weeks.
Any chances that you will be following up on that? Thanks, looking forward to hear from you... my application was : 2000 Jetta GLX.

Thank you in advance, Dan
email me and I'll send out my address info.
 
#29 ·
Vinnie tdi, tap it with a small hammer. It used to be tighter, we removed a little material. You won't break it, the clamp slides over it. The port clear of any obstructions? All fittings are the same, all ports are the same, so something is amiss with that particular one (to state the obvious).
 
#31 ·
Kit is installed and I have my power steering back....I will never take that for granted again. After 100km of driving without PS I'm pretty sure I've gained significant upper body strength.

So I ended up removing the exhaust hanger bracket (not sure if its TDI specific or if you gassers have em) so that I could fit a 4" C-clamp over the fitting because its mounted on a slightly downward angle and the bracket interfered with the clamp. The bolts were rusty as heck but I got them out.

Once I was able to compress the fitting into the port the clip slid on like butter and I was done.

The heatshield requires modification and some of that flexible adhesive heatshield mat would be required to properly cover the gaps in the stock heatshield that result after cutting it.

All in all not too bad an install and great quality product.


EAA: Can I buy spare o-rings from you?