

Given that the 2011 GTIs don't have the "noise pipe", the engine noise is very muffled compared to the 2010 GTIs. Clearly this is an excellent excuse to call APR and order their intake system. Especially with a turbo, intakes just sound downright cool.
So now that I finally have 500 miles on my car, I felt like I could start modding the car and not feel too guilty about it.
Tools that you'll need:
STAGE 1 INSTALLATION:
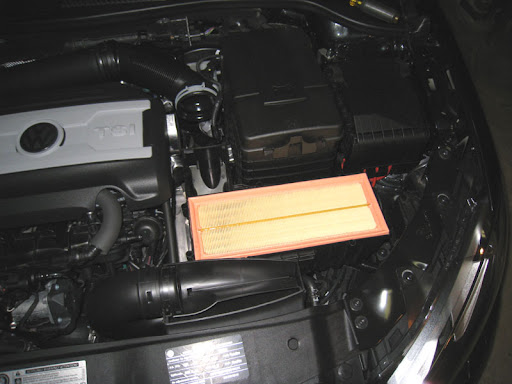
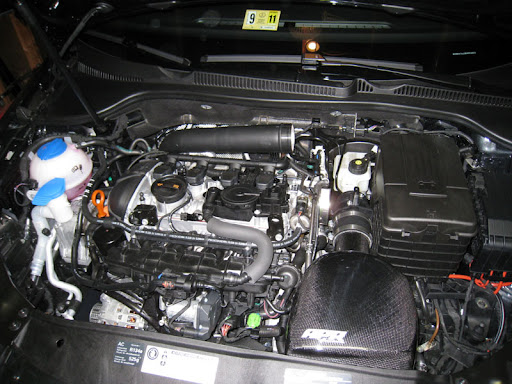
Here it is, stock and boring:
![Image]()
My install is slightly different than how APR recommends, but I found this much easier. First step is to remove the top half of the airbox. It's about 8 or 10 phillips screws holding the top to the bottom of the airbox. Be sure to unplug the MAF and also remove the hose clamp that holds the MAF to the turbo inlet tube.
![Image]()
With the top half gone, now you can easily remove the two T25 screws holding the air inlet scoop. APR lists these as T20, but they are in fact T25.
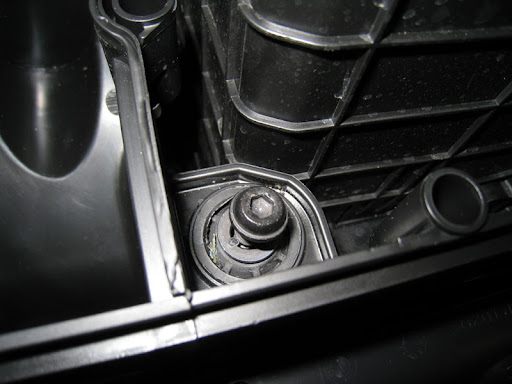
The next thing it do is remove the bolt that holds the bottom half of the airbox to the car. This is a 5mm allen:
![Image]()
Now you can pull up on the bottom half of the airbox to remove it. Be firm, but not forceful, as the airbox sits on two studs which are pressed into rubber grommets in the bottom of the airbox. Once the airbox is free, you'll see a drainage tube that goes from the bottom front right section of the airbox down into the bumper:
![Image]()
This isn't attached to anything, so just carefully keep pulling the airbox out of the car and it will soon be free.
Now it's time to assemble the Carbonio airbox. This is rather simple, just make sure to use the rubber washers provided in the kit, and make sure the rubber side is touching the carbon fiber.
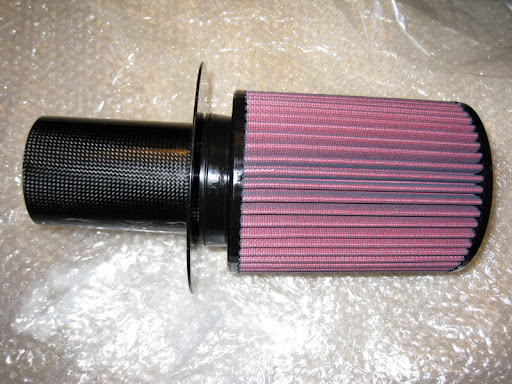
The hardest part is getting the filter onto the carbonio air inlet. To do this, I lubricated the air filter connection with some general purpose cleaner and forcefully pushed and pushed until the filter went over the air inlet connection. I removed the hose clamp all together to make sure I could get enough stretch in the rubber:
![Image]()
Once you have made the connection, fully unscrew the hose clamp and place it around the filter connection and tighten it down. Be careful not to make it too tight - that is not necessary, and you don't want to crack the carbon fiber.
Next remove the MAF from the airbox lid (two phillips screws) and attach the applied silicone coupler. Again I left the hose clamps completely off so I could have more room to stretch, and I also moistened it with some all purpose cleaner so it would slide on easily.
![Image]()
Now you can assemble the Carbonio airbox (it's really not complicated, so I didn't document it), and install it into the car:
![Image]()
I kept it like this for a couple of days so I could see how much of am improvement the Stage 1 makes over stock. The sound increase is not drastic, but it's noticeable and provides a nice deep growl on acceleration as well as increased turbo noise. Power wise I instantly felt it, especially a bump in torque down low. Absolutely awesome - just the right amount of noise, not obnoxious, and a good power bump.
STAGE 2 INSTALLATION:
Now that I have driven around with the Stage 1 for a while, I wanted to see how much of a difference the Stage 2 would make, both in terms of power and in terms of looks.
APR states that this should only take about 20 minutes to install, but I found it a little trickier than the airbox install. This is mostly because it's a tight fit and it takes a while to tweak the pipe and make the fitment correct.
Get your handy hose clamp pliers and remove the section post MAF:
![Image]()
With this section removed, I found it was much easier to remove the T30 bolt (APR incorrectly lists this as a T25 in the instructions) that secures the inlet pipe.
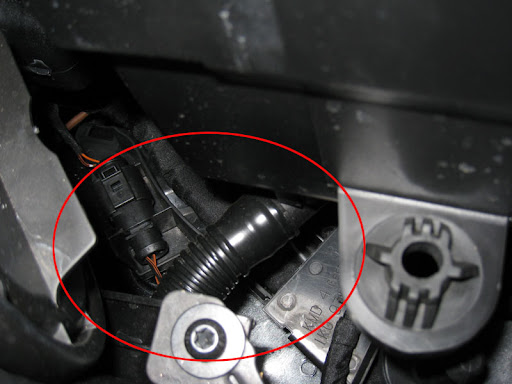
Now use the pliers again and remove the hose clamp that holds the inlet pipe to the turbo coupler. This is a tight fit, so it takes some contorting to get the pliers down there. Once that is removed, slide the pipe up and remove the breather hose:
![Image]()
This is an odd connection (first time for me seeing one of these connections), and I found the easiest way to remove it was to slide a small flat head screwdriver under each side, as that "unhooked" it and it could be removed.
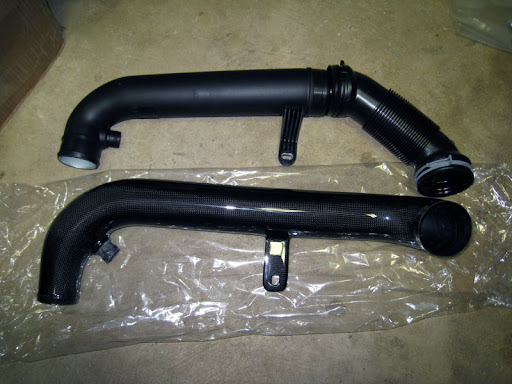
The inlet pipes side by side:
![Image]()
As you can see, the location of the breather hose is different on the two pipes. I noticed that with the Carbonio pipe installed, the breather hose is significantly closer to the heatshield for the downpipe. I called APR and asked about this and they said that that shield doesn't get hot enough to warrant an issue, however I don't know why the hose connection is in a different location.
Now to install the Carbonio pipe, just use the provided hose clamps (not the spring-loaded clamps that were originally used - these will crush the carbon fiber pipe), and as I said before, you don't have to tighten these super tight.
Breather hose connection:
![Image]()
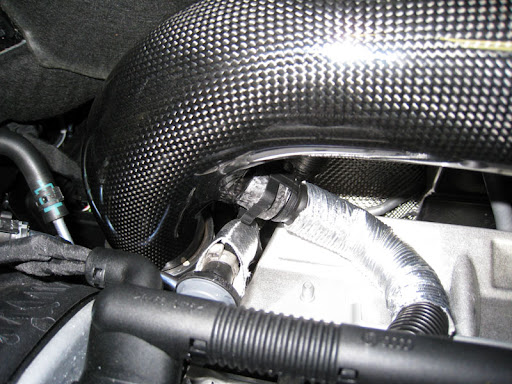
I noticed that the pipe was a little close to the brake fluid reservoir and the brake line, so I propped something between the pipe and the brake fluid reservoir, and then loosened the turbo side hose clamp and then pushed the pipe further into the turbo side.
![Image]()
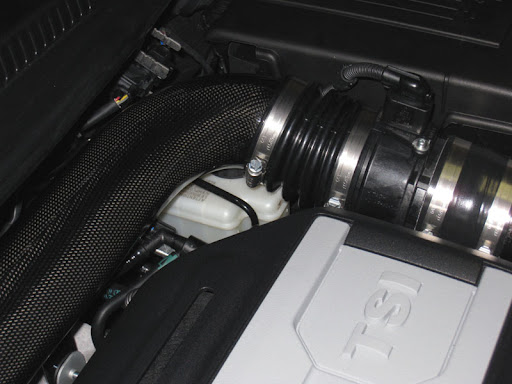
Now you can tighten the hose clamps and the provided 10mm bolt with rubber washer that mounts the pipe to the rear of the engine (replaces the T30 bolt stock). You should have some room between the reservior and the pipe if you followed the above instructions properly:
![Image]()
If the pipe is too close, it will hit when you start the engine, and you'll be able to feel it through the pedals. If so, loosen the clamps and bolt and adjust it for more space.
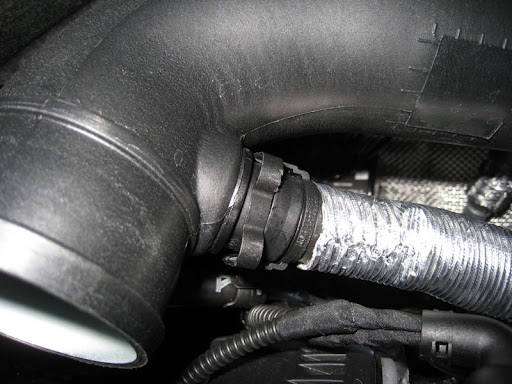
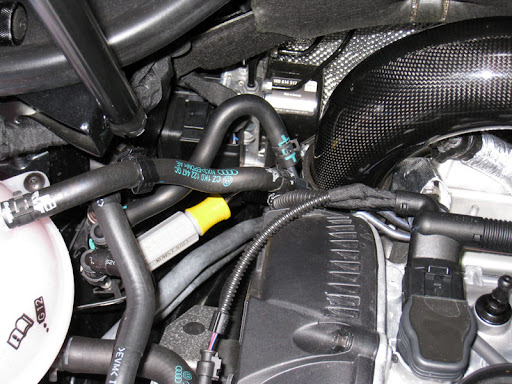
When aligning the turbo coupling hose clamp, angle it as follows so that you can easily reach down and loosen/tighten the clamp with your 8mm nutdriver (this won't apply if you have a 2010 with the noisepipe):
![Image]()
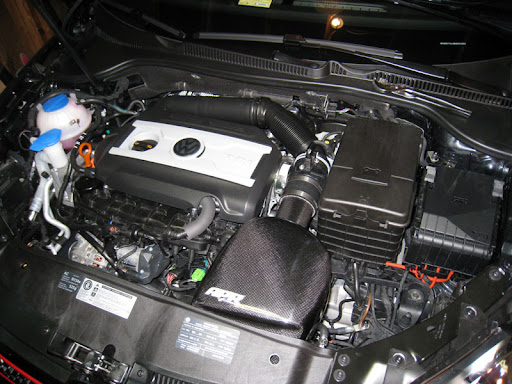
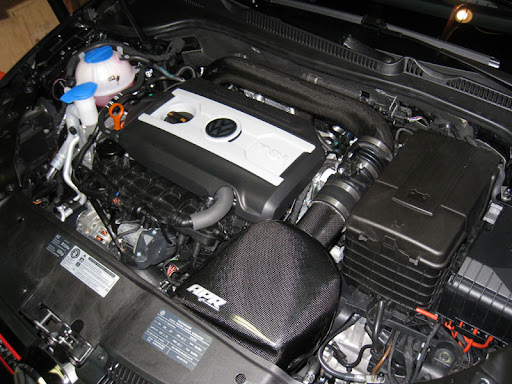
And for the final product:
![Image]()
As you can see, it looks much better than factory, and better than just the stage 1. There was another slight increase in sound (I could hear the DV sound more with the second pipe installed), but I couldn't notice a power bump as I did when installing the stage 1. So if you are just looking for power, you only need the stage 1. If you want a little more sound and a nicer looking engine bay, spring for the stage 2.
Hope this helps.
- Anthony
So now that I finally have 500 miles on my car, I felt like I could start modding the car and not feel too guilty about it.
Tools that you'll need:
- Blue-Point HCP9 Hose Clamp Pliers - $16.70
- 8mm Nut Driver
- T25 and T30 drivers
- 5mm Allen
- Phillips Screwdriver
- 10mm Socket
- 1/4" and 3/8" drivers
STAGE 1 INSTALLATION:
Here it is, stock and boring:

My install is slightly different than how APR recommends, but I found this much easier. First step is to remove the top half of the airbox. It's about 8 or 10 phillips screws holding the top to the bottom of the airbox. Be sure to unplug the MAF and also remove the hose clamp that holds the MAF to the turbo inlet tube.
With the top half gone, now you can easily remove the two T25 screws holding the air inlet scoop. APR lists these as T20, but they are in fact T25.
The next thing it do is remove the bolt that holds the bottom half of the airbox to the car. This is a 5mm allen:
Now you can pull up on the bottom half of the airbox to remove it. Be firm, but not forceful, as the airbox sits on two studs which are pressed into rubber grommets in the bottom of the airbox. Once the airbox is free, you'll see a drainage tube that goes from the bottom front right section of the airbox down into the bumper:
This isn't attached to anything, so just carefully keep pulling the airbox out of the car and it will soon be free.
Now it's time to assemble the Carbonio airbox. This is rather simple, just make sure to use the rubber washers provided in the kit, and make sure the rubber side is touching the carbon fiber.
The hardest part is getting the filter onto the carbonio air inlet. To do this, I lubricated the air filter connection with some general purpose cleaner and forcefully pushed and pushed until the filter went over the air inlet connection. I removed the hose clamp all together to make sure I could get enough stretch in the rubber:
Once you have made the connection, fully unscrew the hose clamp and place it around the filter connection and tighten it down. Be careful not to make it too tight - that is not necessary, and you don't want to crack the carbon fiber.
Next remove the MAF from the airbox lid (two phillips screws) and attach the applied silicone coupler. Again I left the hose clamps completely off so I could have more room to stretch, and I also moistened it with some all purpose cleaner so it would slide on easily.

Now you can assemble the Carbonio airbox (it's really not complicated, so I didn't document it), and install it into the car:
I kept it like this for a couple of days so I could see how much of am improvement the Stage 1 makes over stock. The sound increase is not drastic, but it's noticeable and provides a nice deep growl on acceleration as well as increased turbo noise. Power wise I instantly felt it, especially a bump in torque down low. Absolutely awesome - just the right amount of noise, not obnoxious, and a good power bump.
STAGE 2 INSTALLATION:
Now that I have driven around with the Stage 1 for a while, I wanted to see how much of a difference the Stage 2 would make, both in terms of power and in terms of looks.
APR states that this should only take about 20 minutes to install, but I found it a little trickier than the airbox install. This is mostly because it's a tight fit and it takes a while to tweak the pipe and make the fitment correct.
Get your handy hose clamp pliers and remove the section post MAF:
With this section removed, I found it was much easier to remove the T30 bolt (APR incorrectly lists this as a T25 in the instructions) that secures the inlet pipe.
Now use the pliers again and remove the hose clamp that holds the inlet pipe to the turbo coupler. This is a tight fit, so it takes some contorting to get the pliers down there. Once that is removed, slide the pipe up and remove the breather hose:
This is an odd connection (first time for me seeing one of these connections), and I found the easiest way to remove it was to slide a small flat head screwdriver under each side, as that "unhooked" it and it could be removed.
The inlet pipes side by side:
As you can see, the location of the breather hose is different on the two pipes. I noticed that with the Carbonio pipe installed, the breather hose is significantly closer to the heatshield for the downpipe. I called APR and asked about this and they said that that shield doesn't get hot enough to warrant an issue, however I don't know why the hose connection is in a different location.
Now to install the Carbonio pipe, just use the provided hose clamps (not the spring-loaded clamps that were originally used - these will crush the carbon fiber pipe), and as I said before, you don't have to tighten these super tight.
Breather hose connection:
I noticed that the pipe was a little close to the brake fluid reservoir and the brake line, so I propped something between the pipe and the brake fluid reservoir, and then loosened the turbo side hose clamp and then pushed the pipe further into the turbo side.

Now you can tighten the hose clamps and the provided 10mm bolt with rubber washer that mounts the pipe to the rear of the engine (replaces the T30 bolt stock). You should have some room between the reservior and the pipe if you followed the above instructions properly:
If the pipe is too close, it will hit when you start the engine, and you'll be able to feel it through the pedals. If so, loosen the clamps and bolt and adjust it for more space.
When aligning the turbo coupling hose clamp, angle it as follows so that you can easily reach down and loosen/tighten the clamp with your 8mm nutdriver (this won't apply if you have a 2010 with the noisepipe):
And for the final product:
As you can see, it looks much better than factory, and better than just the stage 1. There was another slight increase in sound (I could hear the DV sound more with the second pipe installed), but I couldn't notice a power bump as I did when installing the stage 1. So if you are just looking for power, you only need the stage 1. If you want a little more sound and a nicer looking engine bay, spring for the stage 2.
Hope this helps.
- Anthony
")


